Way back in August 2023, we began a project to replace the old small wildlife pond on the middle level of the garden with a new bigger one which would be more suitable for wildlife and easier to maintain and observe. It took us almost a year to complete the pond due to various pauses for various reasons. Which wasn’t a massive problem because it was enjoyable taking the time to both create and observe wildlife arriving at the same time.
So what was the issue with the old wildlife pond?
In August 2023, we blogged about three things we felt we had to accomplish in the Garden over the next year. The first was to cut back the hazel tree, which we did over the winter, although perhaps not enough. The second was to create an open area in the bottom meadow, which we let run riot with wildflowers and ended up with nowhere to sit, which we have also now done.
The third and perhaps most important was to remove the old wildlife pond due to it being stagnant/lifeless/a bit smelly and in a small urban wildlife garden, a bit of a waste of space. It was also located beneath a large buddleia bush, which annually deposited a full canopy of leaves into the water where they happily decomposed.
When pond dipping late in the summer of 2023, we found little visible life at all, maybe the odd Water Slater (Asellus aquaticus) and plenty of Physa sp (freshwater snails). As such, we decided to proceed immediately, albeit very slowly. The main tasks to complete were;
- Empty the old pond of water and sludge. Remove the old pond liner.
- Removing the existing vegetation and the mature Buddleia (an invasive non-native unfortunately) and sadly also the California lilac (so loved by the Rose Chafers).
- Clear the site of any sharp objects such as stones and twigs, and form the ponds final shape and depth.
- Install a protective membrane and the pond liner. Allow to fill with rain water.
- Decorate pond edges to add a natural feel, creating multiple refuges for things that only like to dip their toes.
Stage 1: Empty the old pond of water and sludge. Remove the old pond liner.
This wasn’t too difficult, although not exactly a pleasant experience. I think we made the whole street pong a bit for a couple of hours. The water and sludge would be high in nutrients, which was something we needed to consider carefully. Most species which depend directly on the soil (microbes, plants, fungi, and soil fauna) have evolved in nutrient-poor situations, where a balance has been struck which allows species that thrive in nutrient-poor situations to establish, whilst making sure those fewer species that thrive in nutrient-rich environments (sometimes known as aggressive species) are held in check, thus allowing a greater level of diversity. Disposing of the sludge within the wider Garden, for instance by spreading it across the meadow area, could well tip the balance in favor of those fewer aggressive species.

Thankfully, being such a small pond, the amount of nutrient-rich water and spoil was relatively small, considerably less than we thought. So much so that in the end, we were able to simply dispose of both either in situ (beneath the new pond) or in a small pit we dug at the end of the Garden.
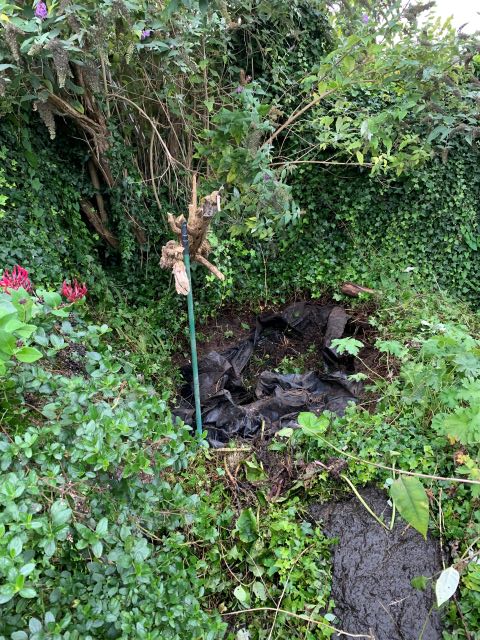
The photo opposite (taken 28.08.2023) shows some of the sludge taken from the pond in the bottom right of the image. The water was disposed of first in the same area. The old pond liner was removed. Worth noting that some pond liners get brittle and the edges very sharp where they bleach in the sun, so garden gloves or similar are recommended to avoid cuts and infections.
The next issue, again relatively simple but rather physical, was to remove the vegetation covering the area. In hindsight we probably should have done most of this before we tackled the pond, but common sense escaped us on this occasion.
Stage 2: Clearing the vegetation
The majority of the middle layer was covered with ivy, which took some clearing and which left a surprising network of roots to be pulled / dug out. But the real challenge was the Buddleia.
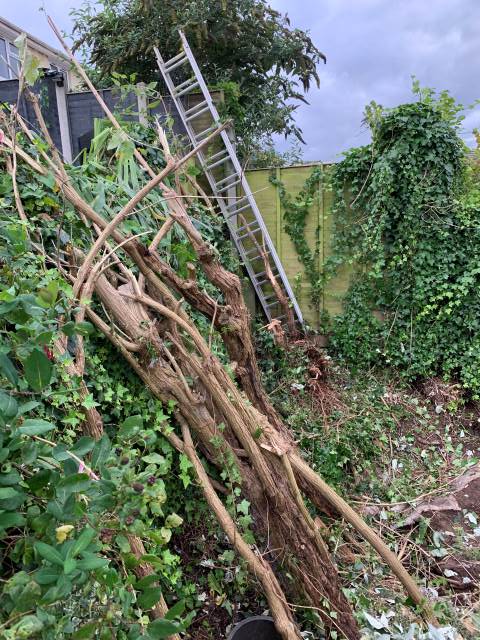
Removing the upper branches and most of the main ‘trunk’ was relatively simple. In fact removing and composting the foliage took much more time. This had to be done however as some of this woody material was sharp and could easily puncture any new pond liner. Photo taken 24.09.2023
Unsurprisingly, it was the root system and lower part of the trunk that would provide the greatest challenge. We initially tried to expose the roots and cut them with a saw. This proved exhausting and difficult, especially for those roots between the trunk and the retaining wall behind, as shown in this image. It really was tucked away in a corner. Photo taken – 25.09.2023
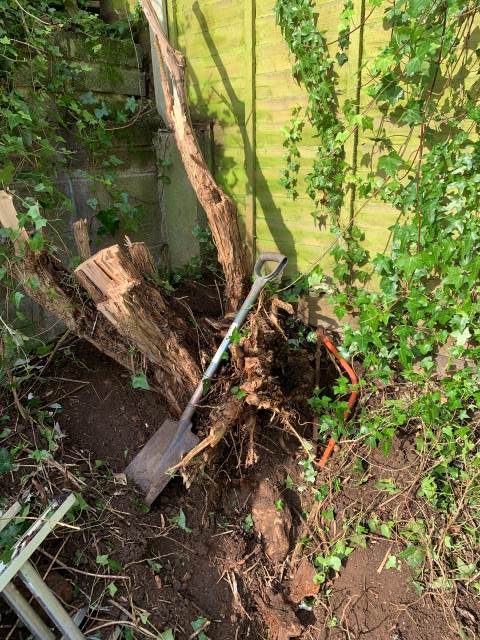

What we eventually found was that if we exposed the root surface, we could carefully drill through it with a flat wood/spade drill bit and then use a garden spade to smash through anything the drill failed to cut. Thankfully, Buddleia doesn’t have a tap root and was soon (a few hours’ hard work) lifted from the soil. Photo taken – 27.09.2023
Stage 3: Clear the site of any sharp objects such as stones and twigs, and form the ponds final shape and depth.
A methodical sweep of the area to remove as much surface debris as possible was easy enough and a process we would do again once the pond was dug. The creation of which followed the basic rules of wildlife pond design. These being sloping sides, a maximum depth of 30-40cm, and some cut shelves/steps.
The sloping sides, from a wildlife perspective, are designed to allow those species that venture in and out of the pond, either by design or by accident, to do so easily. There is, of course, a practical consideration as well. Shallow slopes allow for shallow ponds, something wildlife favors. The vast majority of wildlife utilizing a pond does so in the first 30cm, which is handy because if you dig a small pond too deep, you will of course end up with steep slopes.
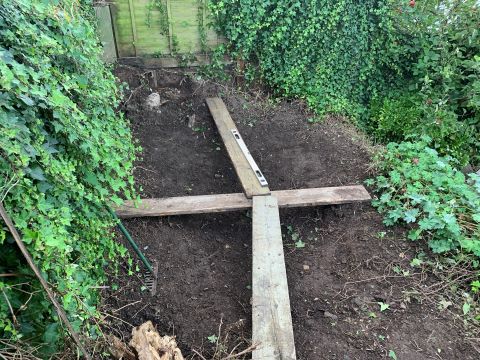
Another advantage of shallow ponds is that you reduce the amount of spoil produced, which in the case above we used to form slightly higher sloping banks. No spoil had to be removed from the area. The scaffolding boards, which we happened to have anyway, were used to ensure the sides of the pond were level. Whilst many sites suggest ensuring the periphery of the pond is all at an equal height, which makes good sense, it is worth pointing out that you really don’t need to spend an age getting this exact. If on filling the pond you see one area is a bit low, just have some soil on hand to build it up in this section. The shelves we cut are not easily visible in the image above, but stand out better once the pond was full of water, see below.
By this time it was early October, following a few weekends of bad weather. It should also be noted we decided to delay ordering a pond liner until we knew for sure what size the pond would eventually be. This was probably sensible but unfortunately caused a further delay as there was a processing error when ordering the liner and it didn’t arrive for several weeks, by which time winter had arrived.
Stage 4: Install a protective membrane and the pond liner. Allow to fill with rain water (or not as it turned out).
Firstly, we had to do another quick sweep of the area for any new stones/debris we may have uncovered while shifting soil about, before installing a soft liner to help prevent future punctures. Most pond liner suppliers now offer this protective covering for free. It is very thin, a bit like a weed barrier, and its effectiveness is for us a little uncertain. But if nothing else, it gave us a clean area on which to work. For our last pond we used old carpet; this time around as we didn’t have any, we put our faith in the products supplied. Photo taken – 27.11.2023
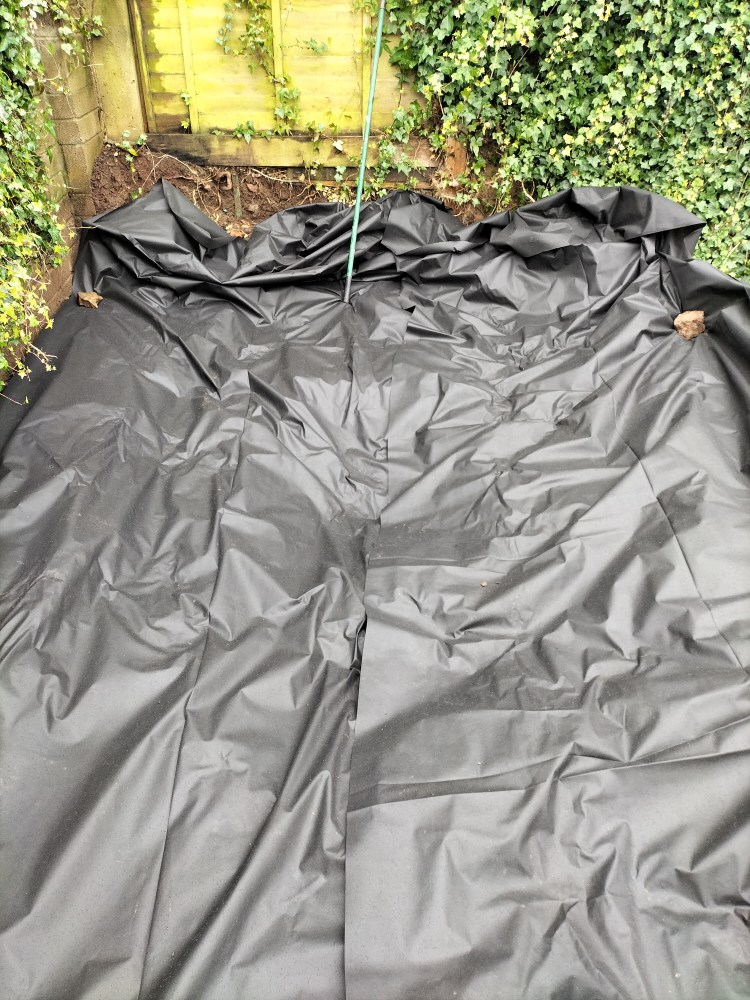
The actual pond liner was added soon afterwards, and it was at this point that we came across our first unexpected issue: cats! It seems cats like to do their business on pond liner, and even worse, they like to do that fake ‘burying of the evidence’ scratchy thing afterwards. We were concerned that their claws would rip the liner before the rain predicted for later in the week could start to fill the pond as we had hoped.
Being unable to police the site 24/7, the only/best solution was to fill the pond with tap water. In this image you can clearly see the shelves we’d cut when preparing the hole.
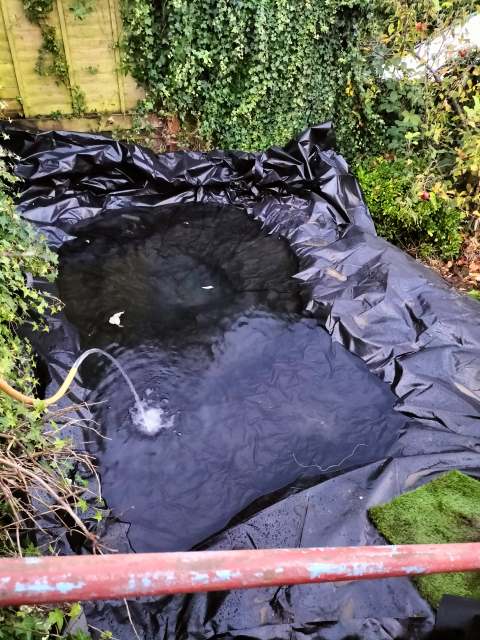
The reason we wanted the pond to fill with rainwater rather than tap water was because rainwater is relatively pure, certainly compared to tap water, which among other things contains about 10 times the amount of nitrate. These elevated levels of nitrate are reflective of the overall eutrophic condition of many of our fresh water systems in the UK, from which some of our drinking water is extracted. These high levels of nutrients within the water (we are not for a second suggesting they are unhealthy) would encourage significant algal growth and reduce the quality of the water, making it less attractive to wildlife. The image below, taken in May 2024, shows murky water, when really it should have been almost clear for such a shallow depth.

Our solution to this issue was dilution. All we needed to do was drain some of the water after each heavy downpour of rain, and gradually the nutrient concentration would drop. Hopefully, the algae would decrease as well, leading to clear water. For us, this was easy. At one end of the pond are a set of steps leading down to a concrete path full of cracks, which allows water to drain away beneath and well away from the adjacent meadow area, where we don’t want additional nutrients added for the reasons given above. See the short clip below. The net was to catch any tadpoles so they could be returned to the pond. Thankfully, this was an unnecessary precaution, but one we would recommend to anyone doing likewise just in case.
To do this, we simply lifted the edge of the pond liner back to the water’s edge and dug a very shallow channel, about 3cm deep, back to the edge of the area next to the steps. We then replaced the liner and filled the channel created with gravel, creating our drainage channel. At the step end, excess liner could be raised to prevent water from draining away when we didn’t want it to, effectively creating a sluice. Throughout spring, we continually repeated the process of draining significant amounts of water from the pond as it filled with rain water. The results by summer were staggering, as the image below shows.
Stage 5: Decorate pond edges to add a natural feel
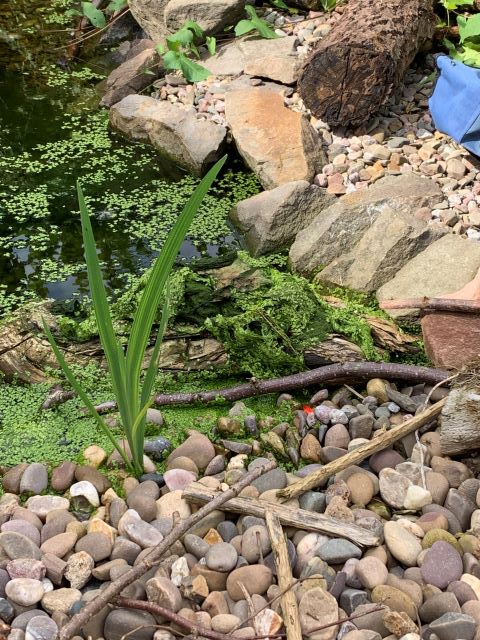
As the nutrient levels lowered so did the turbidity of the water, so by August the water was crystal clear, you could see the entire bottom of the pond and all that lived their.
The excess pond liner around the edges was only partially cut away. In places around the edges where we knew no one would step, we folded the liner back on itself. We did so because on many occasions we observed that both frogs and newts liked to shelter in these folds. We added gravel, pebbles, rocks and deadwood to both the pond and its periphery, ensuring access to folded areas was maintained, giving the whole pond a much more natural feel. To protect the pond liner, we placed folded excess cut pieces of liner beneath the larger branches we placed in the pond.
Unfortunately, we once again failed to account for the habits of cats. Not only do cats like to do their business on pond liner, it turns out that they prefer gravel. And if that gravel is resting on pond liner that leads down to water, guess where all those catty nutrients end up. Duckweed had already appeared in small amounts early in the year, but didn’t really flourish. But once we started smelling cat wee near the pond, duckweed and algae growth began in earnest, probably aided by the sunny weather.
Our solution to the cats has been to cover the gravel areas with pokey sticks, scratchy logs, and uneven stones, making it far less attractive as a lavatory. We have also begun gradually removing the weed/algae so that we can take some of the nutrients from the pond system, as shown here with a small pile of duckweed/algae (the dark green) removed and placed on a log to allow any wildlife caught up in these plants to escape back to the pond below.
We are confident that over the autumn and winter of 24/25, we will see enough rain to allow some of the excess water captured by the pond to be drained into the wetland area we created on the bottom level of the Garden. Our hope is that moving forward, the wetland area will get plenty of excess fresh water supplied from the pond, and by summer 2025, hopefully, we will have both systems working well together.
Why go to all this trouble….
Wildlife began using the pond almost as soon as it was full. A few days after filling the pond, whilst folding back some of the excess liner, we discovered three Common Frogs hiding under the liner. A week later our first newt was found. Oddly, and worryingly and as mentioned elsewhere on this site, we have not recorded any Common Toads since before we began this Garden project in 2021.
It was amazing to record newts so quickly, and we eventually idenitified them as Palmate Newts. On the 2nd June 2024 we were able to confirm they were already, despite there being absolutely no vegetation in the pond, breeding.
These guys soon began to develop, although we never saw very many. But those we did see were soon looking like this guy.
And this time next year they will hopefully look something like this.
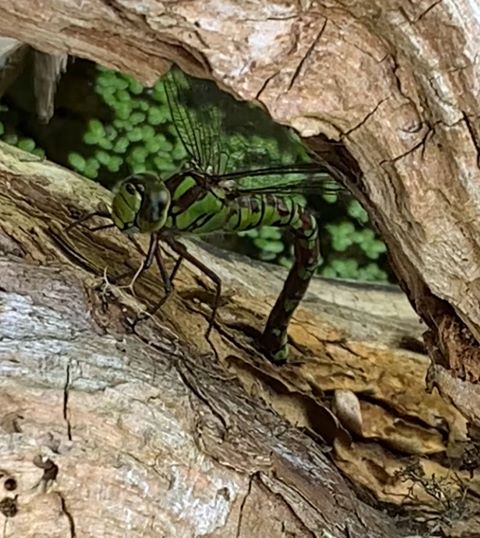
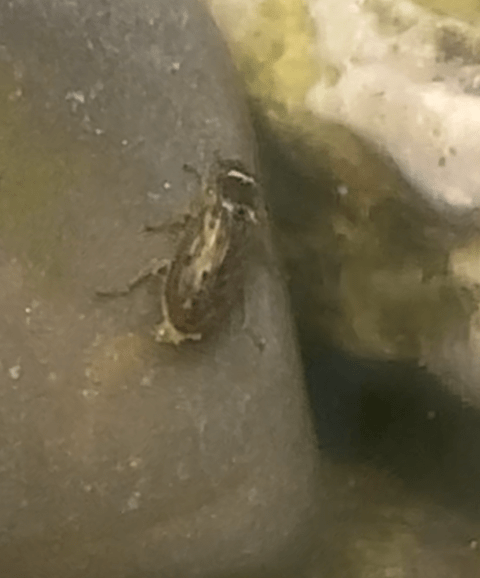
The pond will attract many species not before recorded in the Garden, indeed it already has. Here are just three of them.

DC: 31/08/2024
